For self-hosted Ghost users, a custom configuration file can be used to override Ghost's default behaviour. This provides you with a range of options to configure your publication to suit your needs.
Overview
When you install Ghost using the supported and recommended method using ghost-cli, a custom configuration file is created for you by default. There are some configuration options which are required by default, and many optional configurations.
The three required options are url and database which are configured during setup, and mail which needs to be configured once you've installed Ghost.
This article explains how to setup your mail config, as well as walk you through all of the available config options.
Custom configuration files
The configuration is managed by nconf. A custom configuration file must be a valid JSON file located in the root folder and changes to the file can be implemented using ghost restart.
Since Node.js has the concept of environments built in, Ghost supports two environments: development and production. All public Ghost publications run in production mode, while development mode can be used to test or build on top of Ghost locally.
Check out the official install guides for development and production.
The configuration files reflect the environment you are using:
config.development.jsonconfig.production.json
Ghost in development
If you would like to start Ghost in development, you don't have to specify any environment, because development is default. To test Ghost in production, you can use:
NODE_ENV=production node index.jsDebugging the configuration output
Start Ghost with:
DEBUG=ghost:*,ghost-config node index.jsRunning Ghost with config env variables
Start Ghost using environment variables which match the name and case of each config option:
url=http://ghost.local:2368 node index.jsFor nested config options, separate with two underscores:
database__connection__host=mysql node index.jsConfiguration options
There are a number of configuration options which are explained in detail in this article. Below is an index of all configuration options:
| Name | Required? | Description |
|---|---|---|
url | In production | Set the public URL for your blog |
database | In production | Type of database used (default: MySQL) |
mail | In production | Add a mail service |
admin | Optional | Set the protocol and hostname for your admin panel |
server | Optional | Host and port, or socket for Ghost to listen on |
privacy | Optional | Disable features set in privacy.md |
paths | Optional | Customise internal paths |
referrerPolicy | Optional | Control the content attribute of the meta referrer tag |
useMinFiles | Optional | Generate assets url with .min notation |
storage | Optional | Set a custom storage adapter |
scheduling | Optional | Set a custom scheduling adapter |
logging | Optional | Configure logging for Ghost |
spam | Optional | Configure spam settings |
caching | Optional | Configure caching settings |
compress | Optional | Disable compression of server responses |
imageOptimization | Optional | Configure image manipulation and processing |
URL
(Required in production)
Once a Ghost publication is installed, the first thing to do is set a url. When installing using ghost-cli the install process request the URL during the setup process.
Enter the URL that is used to access your publication. If using a subpath, enter the full path, https://example.com/blog/. If using SSL, always enter the URL with https://.
SSL
We always recommend using SSL to run your Ghost publication in production. Ghost has a number of configuration options for working with SSL, and securing the URLs for the admin /ghost/ and the frontend of your publication. Without SSL your username and password are sent in plaintext.
ghost-cli prompts to setup SSL during the installation process. After a successful ssl setup, you can find your ssl certificate in /etc/letsencrypt.
If you see errors such as access denied from url, then the provided URL in your config file is incorrect and needs to be updated.
Database
(Required in production)
Ghost is configured using MySQL by default:
"database": {
  "client": "mysql",
  "connection": {
    "host": "127.0.0.1",
    "port": 3306,
    "user": "your_database_user",
    "password": "your_database_password",
    "database": "your_database_name"
  }
}
Alternatively you can configure sqlite3:
"database": {
  "client": "sqlite3",
  "connection": {
    "filename": "content/data/ghost-test.db"
  },
  "useNullAsDefault": true,
  "debug": false
}
Number of connections
It's possible to limit the number of simultaneous connections using the pool setting. The default values are a minimum of 2 and a maximum of 10, which means Ghost always maintains two active database connections. You can set the minimum to 0 to prevent this:
"database": {
  "client": ...,
  "connection": { ... },
  "pool": {
    "min": 2,
    "max": 20
  }
}
SSL
In a typical Ghost installation the MySQL database will be on the same server as Ghost itself. With cloud computing and database-as-a-service providers you might want to enable SSL connections to the database.
If your Certificate CA or the CA of your database provider is in the Mozilla trusted CA list you can enable SSL by adding "ssl": true to the database connection configuration:
"database": {
  "client": "mysql",
  "connection": {
    "host": "your_cloud_database",
    "port": 3306,
    "user": "your_database_user",
    "password": "your_database_password",
    "database": "your_database_name",
    "ssl": true
  }
}
This has been confirmed to work with Azure Database for MySQL. To find out if your provider is supported see the Mozilla Included CA Certificate List.
For Amazon RDS you'll need to configure the connection with "ssl": "Amazon RDS":
"database": {
  "client": "mysql",
  "connection": {
    "host": "your_cloud_database",
    "port": 3306,
    "user": "your_database_user",
    "password": "your_database_password",
    "database": "your_database_name",
    "ssl": "Amazon RDS"
  }
}
Custom or self-signed certificates are a little more advanced. You'll need to output your CA certificate (not your CA private key) as a single line string including literal new line characters \n (you can get the single line string with awk '{printf "%s\\n", $0}' CustomRootCA.crt) and add it to the configuration:
"database": {
  "client": "mysql",
  "connection": {
    "host": "your_cloud_database",
    "port": 3306,
    "user": "your_database_user",
    "password": "your_database_password",
    "database": "your_database_name",
    "ssl": {
      "ca": "-----BEGIN CERTIFICATE-----\nMIIFY... truncated ...pq8fa/a\n-----END CERTIFICATE-----\n"
    }
  }
}
For a certificate chain, include all CA certificates in the single line string:
"database": {
  "client": "mysql",
  "connection": {
    "host": "your_cloud_database",
    "port": 3306,
    "user": "your_database_user",
    "password": "your_database_password",
    "database": "your_database_name",
    "ssl": {
      "ca": "-----BEGIN CERTIFICATE-----\nMIIFY... truncated ...pq8fa/a\n-----END CERTIFICATE-----\n-----BEGIN CERTIFICATE-----\nMIIFY... truncated ...wn8v90/a\n-----END CERTIFICATE-----\n"
    }
  }
}(Required in production)
The most important piece of configuration once the installation is complete is to setup mail. Configuring mail allows Ghost to send transactional emails such as user invitations, password resets, member signup and member login links. With the help of a bulk email service, you can also configure Ghost to send newsletters to members.
Ghost uses Nodemailer 0.7 under the hood, and tries to use the direct mail service if available. However in situations where reliability is required, such as sending bulk newsletter emails, an external service is recommended.
We recommend ensuring transactional emails are functional before moving on to bulk mail configuration.
Configuring with Mailgun
Mailgun is a service for sending emails and provides more than adequate resource to send bulk emails at a reasonable price. Find out more about using Mailgun with Ghost here.
Mailgun allows you to use your own domain for sending transactional emails. Otherwise you can use a subdomain that Mailgun provide you with (also known as the sandbox domain, limited to 300 emails per day). You can change this at any time.
Mailgun is an optional service for sending transactional emails, but it is required for bulk mail — read more.
Create a Mailgun account
Once your site is fully set up create a Mailgun account. After your account is verified navigate to Domain settings under Sending in the Mailgun admin. There you'll find your SMTP credentials.
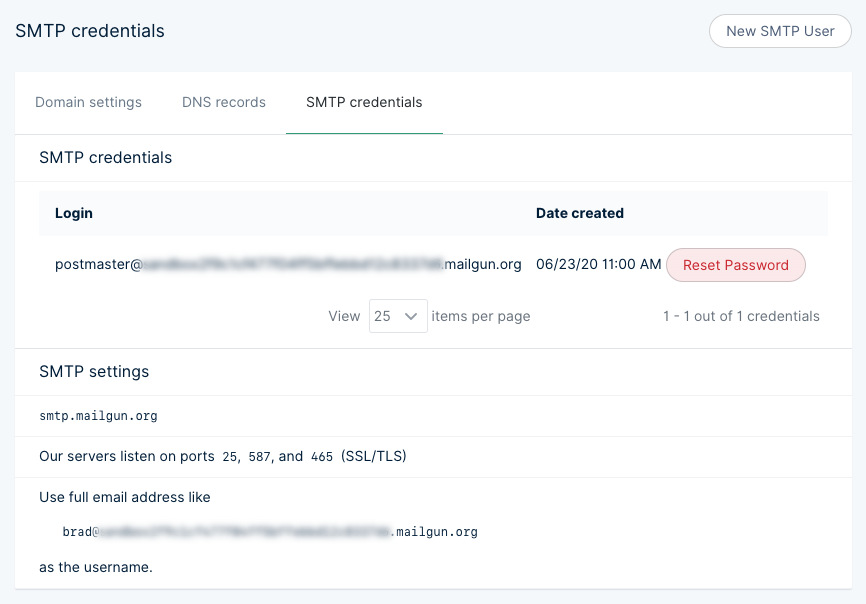
In addition to this information you'll need the a password, which can be obtained by clicking the Reset Password button. Keep these details for future reference.
Mailgun provide options for using their own subdomains for sending emails, as well as custom domains for a competitive price.
Add credentials to config.production.json
Open your production config file in any code editor and add the following mail configuration, making sure to update the values to the same credentials shown in your own Mailgun SMTP settings:
"mail": {
  "transport": "SMTP",
  "options": {
    "service": "Mailgun",
    "auth": {
      "user": "postmaster@example.mailgun.org",
      "pass": "1234567890"
    }
  }
},
Once you are finished, hit save and then run ghost restart for your changes to take effect. These same credentials can be used for development environments, by adding them to the config.development.json file.
Mailgun provides a sandbox mode, which restricts emails to authorized recipients. Once sandbox mode is enabled, add and verify the email addresses you want to send emails to prior to testing.
Secure connection
Depending on your Mailgun settings you may want to force a secure SMTP connection. Update your config.production.json with the following for a secure connection:
"mail": {
  "transport": "SMTP",
  "options": {
    "service": "Mailgun",
    "host": "smtp.mailgun.org",
    "port": 587,
    "secureConnection": true,
    "auth": {
      "user": "postmaster@example.mailgun.org",
      "pass": "1234567890"
    }
  }
},
As always, hit save and run ghost restart for your changes to take effect.
Amazon SES
It's also possible to use Amazon Simple Email Service. Use the SMTP username and password given when signing up and configure your config.[env].json file as follows:
"mail": {
    "transport": "SMTP",
    "options": {
        "host": "YOUR-SES-SERVER-NAME",
        "port": 465,
        "service": "SES",
        "auth": {
            "user": "YOUR-SES-ACCESS-KEY-ID",
            "pass": "YOUR-SES-SECRET-ACCESS-KEY"
        }
    }
}
From address
By default the 'from' address for mail sent from Ghost is set to the title of your publication, for example <noreply@your-publication.com>. To override this to something different, use:
"mail": {
    "from": "support@example.com",
}
A custom name can also optionally be provided:
"mail": {
    "from": "'Acme Support' <support@example.com>",
}
Try to use a real, working email address - as this greatly improves delivery rates for important emails sent by Ghost (Like password reset requests and user invitations). If you have a company support email address, this is a good place to use it.
Admin URL
Admin can be used to specify a different protocol for your admin panel or a different hostname (domain name). It can't affect the path at which the admin panel is served (this is always /ghost/).
"admin": {
  "url": "http://example.com"
}
Server
The server host and port are the IP address and port number that Ghost listens on for requests. By default, requests are routed from port 80 to Ghost by nginx (recommended), or apache.
"server": {
    "host": "127.0.0.1",
    "port": 2368
}
Unix Sockets
Ghost can also be configured to listen on a unix socket by changing the server config:
"server": {
    "socket": "path/to/socket.sock"
}
The default permissions are 0660, but this can be configured by expanding the socket config:
"server": {
    "socket": {
        "path": "path/to/socket.sock",
        "permissions": "0666"
   }
}
Privacy
All features inside the privacy.md file are enabled by default. It is possible to turn these off in order to protect privacy:
- Update check
- Gravatar
- RPC ping
- Structured data
For more information about the features, read the privacy.md page.
To turn off all of the features, use:
"privacy": {
    "useTinfoil": true
}
Alternatively, configure each feature individually:
"privacy": {
    "useUpdateCheck": false,
    "useGravatar": false,
    "useRpcPing": false,
    "useStructuredData": false
}
Paths
The configuration of paths can be relative or absolute. To use a content directory that does not live inside the Ghost folder, specify a paths object with a new contentPath:
"paths": {
    "contentPath": "content/"
},
When using a custom content path, the content directory must exist and contain sub directories for data, images, themes, logs and adapters.
If using an Sqlite database, you'll also need to update the path to your database to match the new location of the data folder.
Referrer Policy
Set the value of the content attribute of the meta referrer HTML tag by adding referrerPolicy to your config. origin-when-crossorigin is default. Read through all possible options.
Logging
Configure how Ghost should log, for example:
"logging": {
  "path": "something/",
  "level": "info",
  "rotation": {
    "enabled": true,
    "count": 15,
    "period": "1d"
  },
  "transports": ["stdout", "file"]
}
level
The default log level is info which prints all info, warning and error logs. Set it to error to only print errors.
rotation
Tell Ghost to rotate your log files. By default Ghost keeps 10 log files and rotates every day. Rotation is enabled by default in production and disabled in development.
transports
Define where Ghost should log to. By default Ghost writes to stdout and into file for production, and to stdout only for development.
path
Log your content path, e.g. content/logs/. Set any path but ensure the permissions are correct to write into this folder.
Spam
Tell Ghost how to treat spam requests.
Caching
Configure caching for sitemaps, redirects or assets.
Compress
The compression flag is turned on by default using "compress": true. Alternatively you can turn it off with "compress": false.
Image optimisation
When uploading images into the Ghost editor, they are automatically processed and compressed by default. This can be disabled in your config.[env].json file using:
"imageOptimization": {
  "resize": false
}
Image compression details:
- Resize the image to 2000px max width
- JPEG's are compressed to 80% quality.
- Meta data removed
The original image is kept with the suffix _o.
Summary
You've explored how to configure a self-hosted Ghost publication with the required config options, as well as discovered how to make use of the optional config options that are available in the config.[env].json file.
If you run into any issues when configuring your publication, try searching this site to find information about common error messages and issues.